A* ALGORITHM BASICS FOR PATH FINDING A* , widely used known form of best-first search & path planning algorithm nowadays in mobile robots,games. this is the function for A*, f(n) = g(n) + h(n) g ( n ) is the cost of the path from the start node to n , and h ( n ) is a heuristic function that estimates the cost of the cheapest path from n to the goal This will find cheapest f(n) value in neighbor nodes to archive goal node. check below image A to B path finding with g(n),h(n),f(n) value In the final level check below image Now we will check the Algorithm // A* Search Algorithm 1. Initialize the open list 2. Initialize the closed list put the starting node on the open list (you can leave its f at zero) 3. ...
One of the keys to the Arduino’s success is the minimal amount of time that it takes for a complete novice to move from opening the little box containing the Arduino interface board to having their first source code, also known as a sketch, up and running on that board. The Arduino software development environment is free to download and use with no lengthy registration procedures or end-user agreements, and there is little to no setup to get the board running
with your computer, regardless of the platform, working equally well on Mac, Linux, and Windows- based PCs. The Arduino web site at www.arduino.cc provides easy-to-follow “Getting Started” tutorials and whenever you get stuck there is always the active, vocal, and generally helpful Arduino community
that is willing to share its knowledge. This low barrier to programming embedded electronics means it’s possible to make lights blink in ten minutes flat with little to no prior experience. This chapter will walk you through the history behind the Arduino platform, with an eye towards what makes the Arduino such a success story. We will look at some of the things that can be done with
the platform and get you started on the right foot with a firm understanding of its possibilities. This includes a brief walk-through of that first ten-minute experience so that we can quickly move into som of our first projects in the next chapter. But first, let’s start with a little background.
Arduino is for Makers
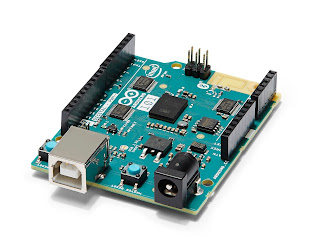
Arduino is a flexible programmable hardware platform designed for artists, designers, tinkerers, and the makers of things. Arduino’s little, blue circuit board, mythically taking its name from a local pub in Italy, has in a very short time motivated a new generation of DIYers of all ages to make all manner of wild projects found anywhere from the hallowed grounds of our universities to the scorching desert sands of a particularly infamous yearly arts festival and just about everywhere in between. Usually these Arduino- based projects require little to no programming skills or knowledge of electronics theory, and more often than not, this handiness is simply picked up along the way. Central to the Arduino interface board, shown in Figure 1-1, is an onboard microcontrolle —think of it as a little computer on a chip.
This microcontroller comes from a company called Atmel and the chip is known as an AVR. It is slow in modern terms, running at only 16Mhz with an 8-bit core, and has a very limited amount of available memory, with 32 kilobytes of storage and 2 kilobytes of random access memory. The interface board is known for its rather quirky design—just ask the die-hards about standardized pin spacing—but
it also epitomizes the minimalist mantra of only making things as complicated as they absolutely need to be. Its design is not entirely new or revolutionary, beginning with a curious merger of two, off-the-shelf reference designs, one for an inexpensive microcontroller and the other for a USB-to-serial converter,
with a handful of other useful components all wrapped up in a single board. Its predecessors include the venerable BASIC Stamp, which got its start as early as 1992, as well as the OOPic, Basic ATOM, BASIC- X24, and the PICAXE.
Where all of these precursors are generally closed proprietary products and often require a single computer platform to use, the Arduino development environment is free for all to use and will run on just about any kind of computer that supports Java. The actual hardware board costs a mere USD $30 or
EUR €22 and needs nothing more complex than a USB cable to get up and running. This affordable price, nearly half that of its closest competitor, and the board’s durable design have led to numerous Arduino-like boards being stitched into embroidery (see Figure 1-2), embedded in pumpkins to be launched through the air by trebuchets, and even sent into outer space in weather balloons.

Comments
Post a Comment